Sunday, October 29, 2006

Phoenix/Jean Grey finished! (Well, kinda. . .)


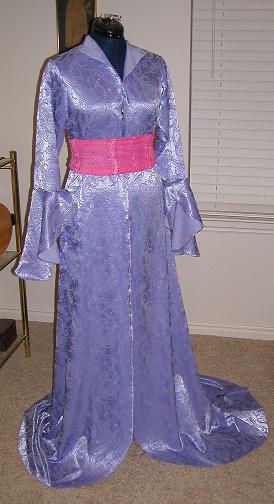
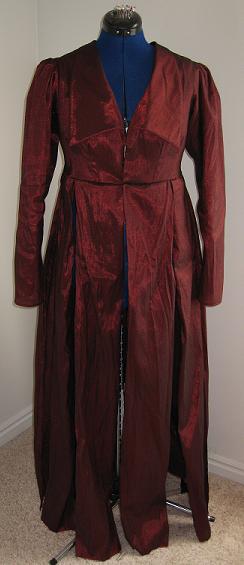
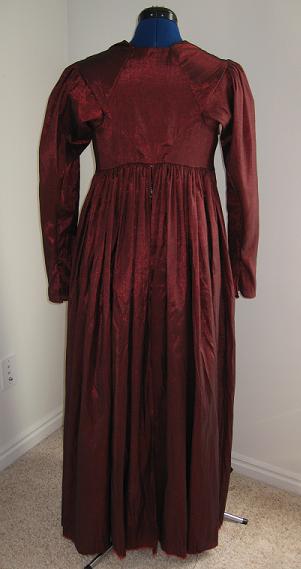
I'm not very good at this "dress diary" thing, I think because I'm impatient! When I sew, I do a marathon--and stopping to take pictures just isn't on the agenda! So here's the semi-finished version of my Phoenix/Jean Grey costume. I say semi-finished because I didn't get a chance to do my shirt to wear underneath (ran out of time) and the boning is causing a bit of a problem in the front where it buckles a bit. So it still needs a bit of work, but overall I was quite happy with it! The jacket pattern, believe it or not, is a Regency era spencer/pelisse--I used Jennie Chancey's Sense & Sensibility pattern and extended the turned-back collar and made the skirt paneled (pleated in the front, gathered across the back). The corset is from a Butterick pattern, with some modifications to the front seams, fake "hip pieces" sewn into the top layer, cutting off the top and adding two inches to the bottom. So here's a pic from the party I went to last night--ran into a Wolverine and couldn't resist taking a pic!

Tuesday, October 10, 2006

Pirates of the Caribbean: Gold Dress, The Home Stretch


Whew! Almost there--I need to attach the trim, and sew the underskirt, and this one is finally done! I'm pretty pleased with how this Simplicity pattern turned out--besides the lacing down the back and making different sleeves, I followed it almost exactly. It's not constructed like the movie version at all (but who has the time or patience for all that pleating in the back?) but it has the right look, I think. For someone who's trying to get as close to the movie version as possible, I would suggest narrowing the stomacher a bit.

Wednesday, October 04, 2006

Pirates of the Caribbean: Gold Dress Bodice Done


Here is the finished bodice, at long last! I just have to tack down the silk bias tape that faces the neck--but it has to be done by hand (blech!) so I'm taking a break for tonight. The sleeve turned out closer to the look of the original than I thought it would--you can't see it in this photo, but I pleated it in the back like the original appears to be. The trim is just pinned on so I could see how it would look. Now, I have to do the panniers so I know how to level the skirt as I attach it.

Tuesday, October 03, 2006

Pirates of the Caribbean: Gold Dress Progress


Here is the update on my progress on Elizabeth Swann's gold dress. The bodice is now nearly complete. Here are two pictures--one of the stomacher with its machine embroidery and hand beading (done while watching The Bachelor: Rome last night--why do I get sucked into stupid reality dating shows?) and the back of the bodice with the installed grommets. I'm using Simplicity's pattern 4092, and have made few changes to it. I changed the sleeves, and will be putting lace around the entire neck edge and around the bottom of the sleeves. I also installed grommets down the back for lacing, rather than a zipper. So if you're working on making this dress from this pattern and have any questions, don't hesitate to ask--I'm happy to share what I've done to modify it to be closer to the original.

Tuesday, September 26, 2006

Pirates of the Caribbean: Shift Dress Complete


The first gown of the Halloween season is done! Here is a photo of my version of the shift that Elizabeth wears while stranded on the island with Jack Sparrow in Pirates of the Caribbean: The Curse of the Black Pearl. I was pretty proud of those sewn eyelets, but the reality is they would have been a pain for whoever ended up wearing the dress. They were slightly too small for the cord I was using, they didn't allow for the lacing to move well, and I worried about whether the new owner would be able to remove them for washing the gown. So, I ended up installing metal eyelets after all--they will make the costume better overall, and the new owner happier overall, so that took precedence over movie accuracy.


And while we're talking about eyelets, I have put in a plug here for another eBayer, Faire Lady Designs (http://stores.ebay.com/FAIRE-LADY-DESIGNS). I bought a HomePro LR grommet setter from her, and it's a dream! I can't believe that I used those plier things to set eyelets before. This machine sets them so beautifully! And if you're looking for high quality eyelets and grommets, there's just no comparison--after buying some grommets from her and comparing the quality, I'll never buy the cheapie ones that you find on JoAnn's notions wall ever again. She ships fast (and doesn't overcharge you for it) and is great to work with. So if you're a costumer that does any kind of corset work, one of these machines and good quality grommets are a must--and her prices are the best I've found.

So the lacing's in (the ends of the laces are also finished--gotta love heat shrink tubing!) and this one is ready to go. It's a size 14 in sewing patterns, which means it will fit about a 36 inch bustline (keep in mind that's not the same as your bra size). As usual, I serged the bottom of this costume but will leave the final hemming to its owner so it fits her perfectly--I made it extra long to accomodate someone who may be quite tall. So here's the finished dress, with the Aztec medallion necklace that it will be eBayed with. If you'd like to be notified when this one is put up for auction, just let me know at dintarmawen@gmail.com.

Monday, September 18, 2006

Pirates of the Caribbean: Shift Eyelets


Progress report for tonight--Elizabeth's shift dress from Pirates of the Caribbean is now cut out, and I did some testing on the sewn eyelets on my Aurora. Here's a sample of how they turned out--after sewing each one I carefully work the hole through with an awl. I should be able to finish the dress by tomorrow night. I also picked up an Aztec medallion replica necklace to be sold with each POTC dress, just in case the people who buy them don't have one already. (They're available at Claire's jewelry stores, but I wanted to get these before the Halloween rush.)

X-Men 3 Phoenix: Fabric


Here is the fabric I found for my Phoenix outfit from X-Men 3: The Last Stand. It's a red/black shot cotton/poly blend, but you'd never know it looking at it--it has this great sparkle to it. (And it crinkles really neat, a lot like it looks in some close-up shots from the movie.) I bought the whole bolt, since with Wal-Mart fabric (yes, Wal-Mart of all places) you never know when they'll get more in if you need it. So I may have enough to do a second outfit to eBay, but we'll see how I'm doing on time by then.

Sunday, September 17, 2006

Pirates of the Caribbean: Materials


Here are some pics from my other two projects--Elizabeth's shift dress and gold dress from Pirates of the Caribbean: The Curse of the Black Pearl. The first picture is of the shift dress fabric--somebody emailed me a request to make up another one to auction, and when I found this fabric I couldn't resist. Like the last one I made, it's a heavier tone-on-tone brocade, with a raised leaf pattern in it. Unlike the last one I made, this one will have sewn eyelets (closer to the original). Once again, the new Bernina comes to the rescue! The other pic is of the materials for the gold dress--the gold brocade, the pearl trim that will go along the front edges of the dress, and the stomacher that I just embroidered the other night. It took over an hour, but I think it turned out really well. The lining is boned (so its new owner won't have to wear a separate corset), so I just have to sew together the outer layer, and attach the sleeves and skirt. I'm hoping this one is going to be a show stopper!

Arwen Farewell Dress: Full Length


Here's a full-length shot--the sleeves are just pinned on for now, and the sash is just a headband I had, since I don't have the fabric for that yet. I just wanted to see how it was coming together--all that's left on it is hemming (it's got this great train out the back), attaching the yoke/rolled collar, and attaching the sleeves. Oh, and I have to find little silver knot buttons for the front and make the sash. The underdress, as I mentioned, is going to be cut along the same lines, but will have a boat neckline and will lace up the back. I'll be using the leftover lavendar material to make some embroidered arm bands and a belt to dress it up when it's worn without the "elven overdress." The new owner will really be getting two dresses in one!

Arwen Farewell Dress: Sleeves


Here is a close-up of the sleeve--the pattern I'm using is Simplicity 8725 (medieval style, no princess seams) with the rolled collar from 0513. I just chopped the sleeves off just past the elbows, and then drafted this petal sleeve using kind of an oval shape. I like this shot because it really shows off this gorgeous fabric. This is going to be a one-of-a-kind, for sure--I bought this fabric years ago and never knew what to make out of it until I was looking through my costume research and saw Arwen's dress, and knew that's what it was supposed to be! It's got the weight of a really heavy dupioni silk, and the rough weave of one, but without the slubs. Then the paisleys are this great velvety raised design. I might have a hard time parting with it--I'm making this one to auction on eBay in early October!

Arwen Farewell Dress: Embroidery on Yoke


Well, I promised some pictures, so here they are! These are the beginnings of the Arwen "Farewell Dress" I've been working on. This is a close-up of the silver metallic embroidered yoke for the rolled collar that I'll be putting on next (it's photographed on top of the purple fabric that will be a completely separate underdress--the colors are off, since the purple is looking much more blue than it is). The embroidery was done on my Aurora, just using a design that came with my software--I mirrored it and joined the two sections end to end and rotated them. I used Marathon silver metallic thread--I wasn't using a metallic needle so I did have about six thread breaks, but was pleased with how it turned out.

Friday, August 11, 2006

Embroidery: Topping

I mentioned in my last post that I've been doing piles-o-towels lately. They're the loopy microfiber kind, and I found that the Aqua Film as a topper was making a mess--it kept getting sticky and then my presser foot would drag it all over the place. So I tried something new--using Sulky Ultra Solvy as a topper. Worked wonders--you would swear that it was a completely different stitch count, the results were so much better. So if you're working on something really loopy or with a deep pile, use some Ultra Solvy as your topping--it will make your stitch-out so much better! I'll post a photo of both side by side so you can see the difference.

Thursday, August 10, 2006

Gearing Up for the Halloween Season

It's been a while since I've posted, and that's mostly because I've been so busy! I've been giving my Aurora a workout (I've embroidered nearly 100 golf towels) and I'm in the middle of finishing some costume tops for our Middle Eastern dance troupe. One word for any of you who do dance costumes--sergers! Can't live without one now. In the meantime, I've been experimenting with tie-dye and posted a batch of dance veils on eBay a few months back and got some really good reviews of them, so I just did another batch and will post those shortly. These have matching skirt toppers and head scarfs--I just hate when you get a new veil and then can't find a thing to wear to match. (Yes, I'm a little picky.)

On the Halloween front (for those of who who don't think about what you're wearing until the night before--for shame!) I'm making myself Phoenix's outfit from the newest X-Men movie (the red/black shot silk corset-y number). I also have to quilt my colonial skirt that I made last year (another test for my Aurora--the BSR). For eBay, I'm making the following:

  • Elizabeth Swann's gold dress from Pirates of the Caribbean (the first one)
  • Leia's Ewok dress from Return of the Jedi
  • A Jane Austen style dress--possibly generic, although I have some yummy silk and may make Elizabeth's white ball gown from the new Pride and Prejudice. Shameless plug here--if you haven't checked out the new Simplicity patterns for Halloween, you must buy the two Regency ones that just came out. They were done by Jennie Chancey, who runs Sense & Sensibility Patterns (www.sensibility.com). She does amazing work and is one of the nicest people on the planet. =)
  • Arwen's lavender farewell dress from LOTR: Fellowship of the Ring
Well, okay--those are the ones I have the fabric for. Whether I get them done or not is another story. =) But this is why I'm posting my plans here, for all the world to see--I work best under pressure. =)The gold POTC dress is halfway done--pictures will be posted soon!

Thursday, April 13, 2006

eMotions: Au Revoir, Marie!

Sorry for the long hiatus--I've had little time for sewing lately, but am finally getting back into the swing of things.

Things really didn't improve with my eMotions machine. My machine started breaking needles, and I started getting major thread nests in the bobbin case on occasion--the machine makes a very distinctive knocking noise when it starts happening so I'd know to run for the machine to stop it. (Then I'd be picking out thread of the bobbin case for the next half hour. . .) So long story short, when it was working it was a fabulous machine--when it was unhappy, it seemed like nothing in the world could get it working again.

And yes, I'm using the past tense--this last Saturday I traded mine in towards a new Bernina Aurora 440QEE. I was going to hang on to the eMotions machine for a bit longer and add the embroidery module in a few months, but my dealer offered a $400 trade-in for it so I jumped at it. (I think my dealer was relieved to see it come back so they wouldn't have to hear me griping about it anymore.) =)

I don't regret buying my little eMotions machine at all though--I still think it's a great starter machine and I successfully embroidered dozens and dozens of projects on it. My plan all along was to see if I got hooked on embroidery enough to justify splurging on a "real" machine, so if someone is in that boat I think it's a great way to try it out for a minimal investment. I just ended up using mine a little too much than I think it was designed for so I noticed more of its quirks, and started getting frustrated with its limitations. But I loved the eMotion's USB interface that lets you control your machine from your computer, and it's one of the reasons I decided on the Aurora.

Stay posted for reviews as I try out my new toy, and some photo comparisons between embroidery done on the Emotions machine and my new Bernina to see if it's really worth the investment!

eMotions: Recommended Accessories

These are my completely biased, non-scientific recommendations on what's worked well with my eMotions machine--I hope it helps you get the most out of your embroidery. =)
  • Marathon Thread: you've already heard me rave about this stuff. Everytime I've had problems with thread breaks, it was because I was trying to use a thread other than my Marathon. Those little Sulky spools wind the thread so tight that I think the eMotion's really tricky tension can't take the curlyness as it unwinds.
  • YLI Lingerie & Bobbin Thread: I only bought this because it was on sale at Hancock Fabrics, but it's really worked well. (What didn't work well? Those pre-filled bobbins with the cardboard sides. I never finished using the ones that came with the machine because they kept causing thread jams.)
  • HR5 Spray & Stick adhesive from Helmar (bought it at my Bernina dealer--it's an OESD product, I think): fabulous stuff for sticking your stabilizer to your fabric before hooping. I never had a problem with my needle getting gunky from it, and you can reposition things easily.
  • OESD AquaFilm Wash-Away Topping: comes in a little roll, but it lasts forever! (Since you're only using enough to cover your design, not hooping it.) Spray a little adhesive on it and put it on top of fleece before embroidering your design--it keeps your stitches from disappearing into all of the fluff. Tears away pretty well, and you can put some water on any film left behind to dissolve it (beware, it may leave the fabric a bit sticky, because of the adhesive).
  • Super Solvy Water Soluble Stabilizer: love, love, love this stuff. It tears away cleanly and anything left can be dabbed away with a little water.
  • Sulky Cut-Away Plus Stabilizer: great for knits--provides a firm background when you're embroidering but washes up quite soft.
(These last two are sold at JoAnn's--I just always use a 40% off coupon on a new roll so it's much cheaper.)

Thursday, February 16, 2006

eMotions: Status Update

I've been absent for a bit, but squeezed a few more projects out of my embroidery machine. I phrase it that way because it's been having some tension problems lately. I have had to set the upper tension very high (7) to get it to work, but even then, it will not stay consistent (one side of a stitch will look okay, the other will be off). I've decided to take it into my Bernina dealer to be looked at, but have not had time to do it. That said, I have discovered that the tension can be thrown off for just about any tiny reason--most recently, the thread was running over the USB cord on the back of the machine, and just that was enough to produce enough drag to really make it unhappy.

Friday, January 06, 2006

Artista Auto-Designer

Well, I took the plunge and purchased Artista Auto-Designer, since Bernina was offering a rebate if you already owned Explorations. I have a long learning curve ahead of me, but it's nice to finally have the capability of doing my own designs. If you want step-stitched embroidery, the magic wand or auto-digitizing tool is a breeze--satin stitches take a bit more tweaking because you have to make sure that the stitches are angled in a logical way. (And it REALLY doesn't like it when two lines intersect--I've been doing a lot of swirled clip art designs and they take some prep work beforehand.)

Stay tuned for some pictures of my digitizing efforts, and news on CDs I'll be making with designs for costuming in mind! (All the cutesy animal ones on eBay are nice if you're doing kids' clothes, but I'm going to be concentrating on creating designs you can use for embellishing clothing.)

(My next project, now that I finally have the tools to do it? Padme's picnic dress from Star Wars: Attack of the Clones. . .well, at least I've bought the material for the cape!)